Workflow Starting From
Paper
The following is an example of the process from going from a paper form (or word document) to an AppliTrack Form with Workflow (multiple people each having a step on the form).
For more information on the form creation process, please
visit this link:
Create
a New eForm
Here's
how:
Understanding the workflow of YOUR form.
We recommend that a visual representation of the workflow be drawn up prior to creating it in AppliTrack. As an example, I have provided a form here which has a workflow in the real word:
Once downloaded, you can see that there are parts of this sheet of paper which, when printed, will go from one person to another. This process of passing the paper around is what we refer to as the “workflow”. As such, this tutorial will focus on getting that workflow into AppliTrack.
STEP 1: Print the form up and divide into steps.
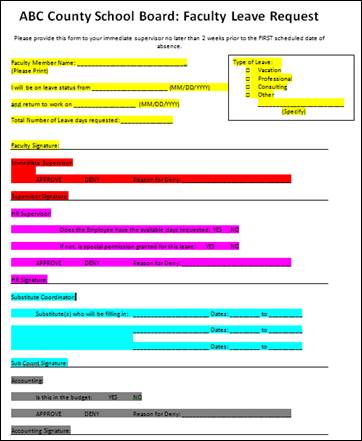
In the image below, I have opened the Word document (link above) and highlighted each area that is a single person’s responsibility in a different color.
Yellow = Employee Red
= Immediate Supervisor Pink = HR Supervisor
Blue = Substitute Coordinator Grey = Accounting
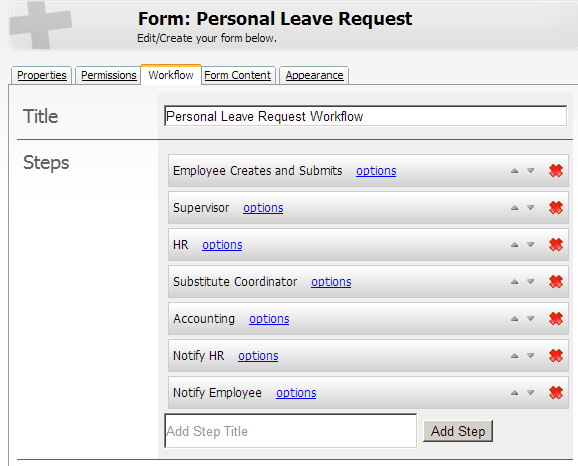
STEP 2: Add the Steps
of those people who just need to be Notified
Now that this is done, I can see all the people who need to take
ACTION on this form.
I can also see that some people just SUBMIT the form and
some people can APPROVE or DENY the form.
A SUBMIT or an APPROVE will just flow to the next step, but
a DENY can go anywhere (for this example, ABC County Schools sends the form
back to the Employee to let them know of the Denial).
Those movements are the workflow, and the people are the
steps.
Now, aside from taking ACTION, I may also just want to let
someone know when the form is in a certain stage, this would be an EMAIL
NOTIFICATION step (as opposed to and ACTION step). So, each notification can be
a step, or if many people need to be notified at once, they can be grouped in a
single step. Let’s say for this example, if the final ACTION step is APPROVED,
we’ll let HR and the EMPLOYEE know.
So, Adding to our ACTION step list from above…
Yellow = Employee
Red = Immediate Supervisor
Pink = HR Supervisor
Blue = Substitute Coordinator
Grey = Accounting
EMAIL HR
EMAIL EMPLOYEE
STEP 3: DRAW IT OUT
So, let’s draw that out visually, with each of the 6 STEPS
indicated by a person, and with the ACTION that causes a move denoted by the arrows
from one STEP to another:
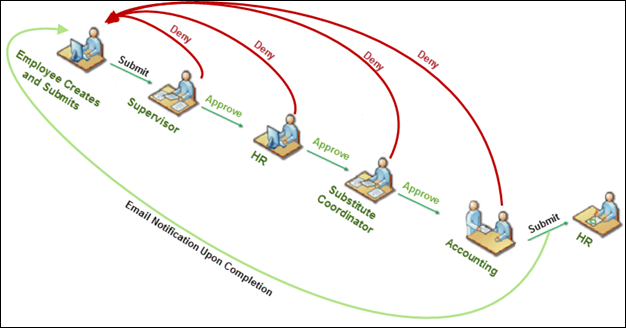
So, here we can see the people who have to take ACTION, and
the results of each ACTION taken.
Any DENY sends the form back to the EMPLOYEE who started it.
APPROVEs or SUBMITs send the form along to the next step.
Now, this is the first walkthrough of many, but in general,
setting up the Workflow for your current form is as easy as 1-2-3!